A Pot Holder is a useful to thing to have in the kitchen, and you can make one of these in an hour or so.
To use one for carrying something warm from the kitchen to the table, you would only need to put the 2 circles of batting inside.
In this example, the pot holder has been made to cope with a hot bowl by putting 2 layers of Insul Bright Heat Resistant material inside the front piece. (Although due to the silver covering it can’t be put into the microwave).
If you haven’t used it before, Insul Bright has polyester fibres, which have been needle-punched through a reflective metalized polyester film.
It is breathable and resists conduction while the reflective metalized polyester film reflects radiant energy, hot or cold, back to its source.
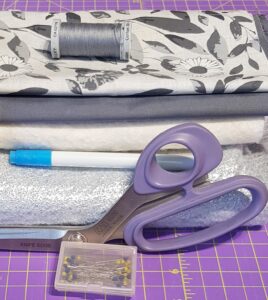
Requirements for One Pot Holder
2 Fat Quarters of contrasting cotton fabric (and a little extra for the binding)
2 x 9″ of Insul Bright Material (if using)
3 x 9″ of Cotton Batting
Matching Machine Cotton
1/4″ foot
Pins
Water Soluble Marker Pen (or Taylor’s Chalk)
Snippers
Fabric Scissors
12″ Ruler
Iron and Board
Compass to draw a circle, or a bowl that measures 8.5″
Instructions
Fold both fabrics in half and draw a circle approximately 8.5″ on both pieces. I found a bowl that I could draw around, or you could use a compass.
Using your fabric scissors, cut these out, so that you have two circles from each fabric.
Take just one circle from each fabric and cut it in half. I folded one in half to find the center line and drew a line to cut along. So that you end up with 4 half circles.
Cut out 3 circles of cotton batting to the same size, and taking just one of these cut it down the middle as you did with the fabric.
And cut out 2 circles of Insul Bright the same size (if you are using this).
You should now have
4 circles of cotton fabric
2 Circles of cotton batting
4 half circles of cotton fabric
2 half circles of cotton batting
2 circles of Insul Bright (if using)
Layer your half circles of fabric with one half circle of batting in between each side.
You will now need to trim a little off the half circles to create a gap so that you can easily put your fingers into the ‘flaps’ when the pot holder is made.
As you can see in the next photograph. You will put a mark at 1cm at one end, and 1.5cm at the other end, on each side of the half circle sandwiches.
Draw a line down to join both dots, and cut down the line, using fabric scissors on both sides.
You can now layer the rest of your fabrics ready for sewing.
In this image you can see that I am using the plain fabric as my lining, and therefore the two shiny sides of the Insul Bright are facing upwards, away from the lining towards the front patterned fabric, the two circles of batting are put next to the plain lining fabric.
Pin your sandwiches of fabric together and sew some lines to create a quilted look.
Cut 2 lengths of binding at 2.25″ wide for your half circle straight edges.
You can cut straight strips for these, (I cut mine a little longer at around 10 inches).
Apply binding to the straight edges of the half circles at just under a 1/4″ stitch line using a 2.2 stitch length.
When sewn, roll the binding over and iron the edge flat so that it sits neatly underneath.
Stitch in the ditch along the top edge to secure the underside of the binding.
As the main circle will require binding too, you will need to cut the binding strips for this, on the bias, so that the binding will stretch around a circular edge.
For the circle you will need around 28″ made up of strips, but then add more to the length depending on which method you use, to join the ends together.
Pin your half circles with wrong sides together ready for you to apply your binding.
Pin your binding on top of the side with the two half circles.
Sew along the edge using just short of a 1/4″ seam and a short stitch length of 2.2.
Roll the edge over to the underside and iron it flat so that it sits nicely underneath and hand stitch the other side down or use the stitch in the ditch method from before.
Now that you have made this, you might like to make another for the other hand!
We use cookies on our website to give you the most relevant experience by remembering your preferences and repeat visits. By clicking “Accept”, you consent to the use of ALL the cookies.
This website uses cookies to improve your experience while you navigate through the website. Out of these cookies, the cookies that are categorized as necessary are stored on your browser as they are essential for the working of basic functionalities of the website. We also use third-party cookies that help us analyze and understand how you use this website. These cookies will be stored in your browser only with your consent. You also have the option to opt-out of these cookies. But opting out of some of these cookies may have an effect on your browsing experience.
Necessary cookies are absolutely essential for the website to function properly. This category only includes cookies that ensures basic functionalities and security features of the website. These cookies do not store any personal information.
Any cookies that may not be particularly necessary for the website to function and is used specifically to collect user personal data via analytics, ads, other embedded contents are termed as non-necessary cookies. It is mandatory to procure user consent prior to running these cookies on your website.